Shop Pay Setup Guide
Complete step-by-step instructions to integrate Shop Pay with your WooCommerce store
⚠️ Important Security Notes
Before you start, please read these critical security guidelines:
- Never share your Storefront API token
- Don't commit credentials to version control (GitHub, etc.)
- Use a password manager if storing temporarily
- Only paste into WooCommerce settings when ready
Step 0: Enable Shop Pay in Shopify Admin
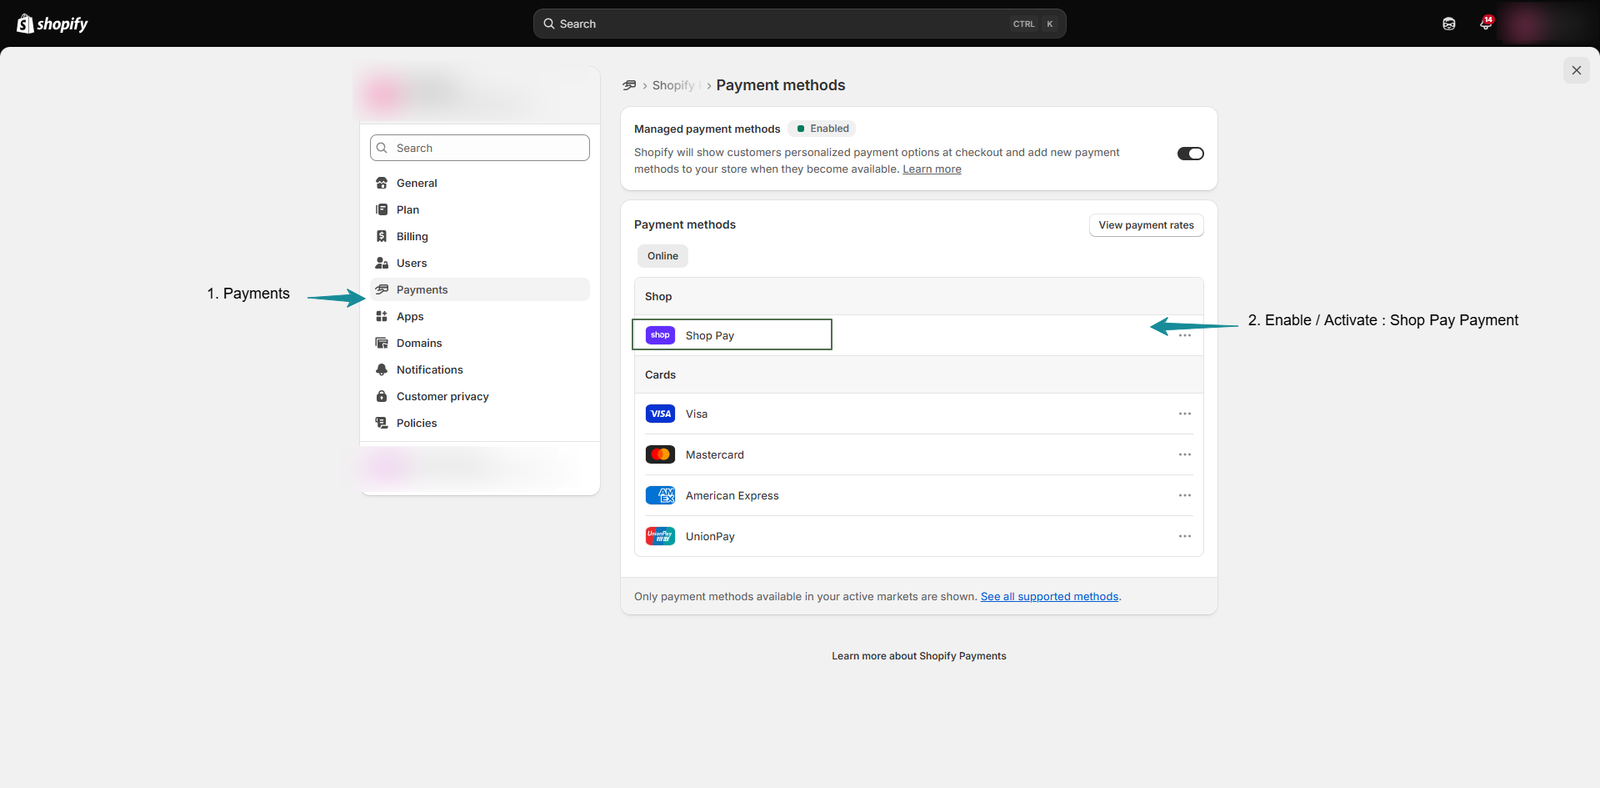
Before gathering credentials, ensure Shop Pay is enabled as a payment method in your Shopify store.
Navigate to Payment Methods
- Log in to your Shopify admin
- Go to Settings (left sidebar)
- Click Payments
- You'll see the Payment methods page
Enable Shop Pay
- Under the Shop section, find "Shop Pay" (marked as "Free")
- Click on the Shop Pay card to expand settings
- Click Enable to activate Shop Pay
- Confirm the activation
Save Changes
Confirm and save any changes made to payment methods.
Step 1: Gather Your Shopify Credentials
You'll need to collect several pieces of information from your Shopify Shop Pay account.
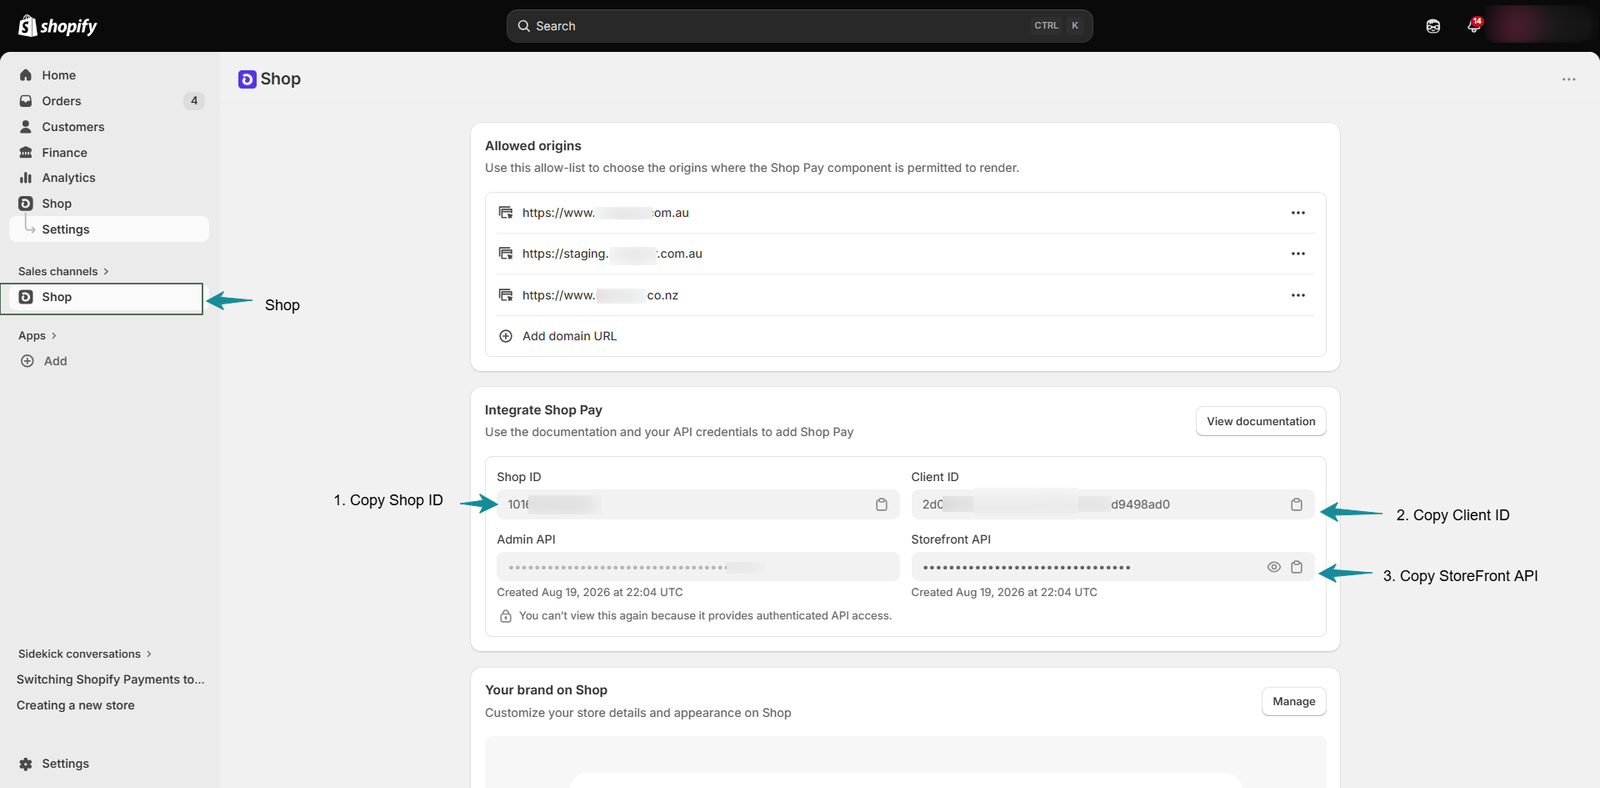
1.1 Get Your Shop ID and Client ID
- Log in to your Shopify admin
- Navigate to Shop → Settings
- Look for the "Integrate Shop Pay" section
- You'll find:
- Shop ID - A numeric identifier (example:
1234567890) - Client ID - A UUID-format identifier (example:
abc12def-34gh-56ij-78kl-901234mnopqr)
- Shop ID - A numeric identifier (example:
1.2 Get Your Storefront API Access Token
In the same "Integrate Shop Pay" section:
- Locate the Storefront API field
- This is a secure access token for WooCommerce to communicate with Shop Pay
- CRITICAL: This token is hidden after creation - you'll see dots/asterisks masking the value
- Click the copy button to copy it
- Once you navigate away, you cannot view or re-copy this token - regenerate if lost
- Store it safely - you'll need it for WooCommerce settings
1.3 Get Your myshopify.com Handle
From your Shopify admin:
- Find your store's myshopify.com domain
- Example:
mystore.myshopify.com - You'll need this for WooCommerce configuration
Step 2: Configure Allowed Origins (Add Your Store Domain)
Shop Pay needs to know which domains are allowed to use it. Add your WooCommerce store domain to Shopify's allowed origins.
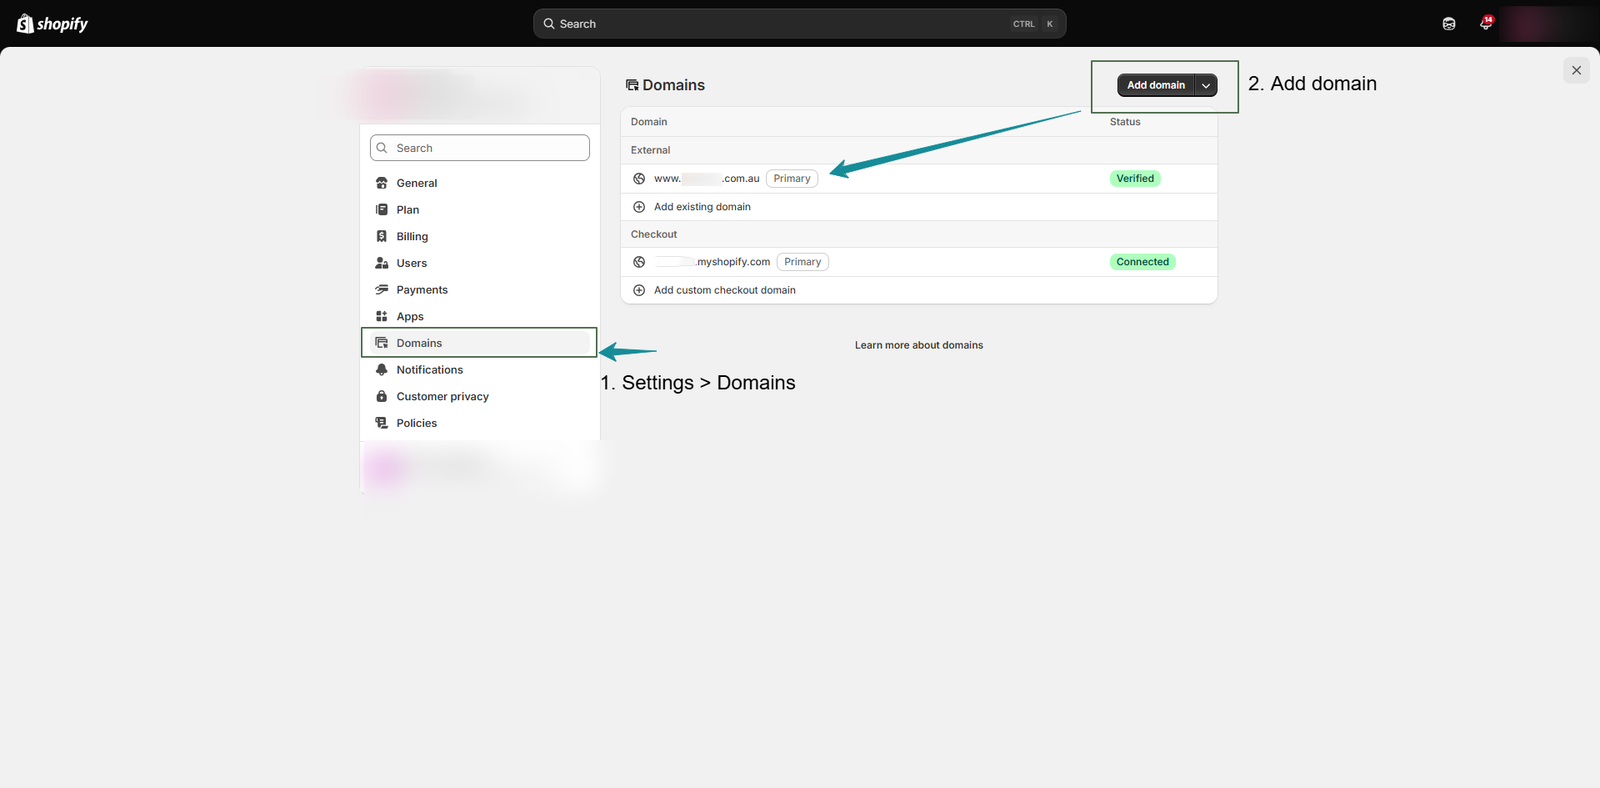
2.1 Navigate to Domains Settings
- In your Shopify admin, go to Settings
- Click Domains
- You should see your external domain listed (e.g.,
www.yourdomain.com)
2.2 Verify Your Store Domain
- Look for your primary External domain
- It should show a status of "Verified"
- If not yet added, click "Add domain" and follow verification
- Example:
https://www.yourdomain.com.au
2.3 Add Multiple Domains (Optional)
You can configure multiple domains in the Allowed origins section at the top of Shop Pay settings:
| Environment | Example Domain | Purpose |
|---|---|---|
| Production | https://www.yourdomain.com.au |
Live/primary store |
| Staging | https://staging.yourdomain.com.au |
Testing before going live |
| Alternative Market | https://www.yourdomain.co.nz |
Different country domain |
| Development | https://yourdomain.local |
Local development (if needed) |
To add multiple domains:
- Go to Shop → Settings (Shopify admin)
- Scroll to Allowed origins section
- Click "Add domain URL"
- Enter each domain in full HTTPS format:
https://yourdomain.com
2.4 Add Staging Domain (Recommended)
For testing before going live:
- In Allowed origins, click "Add domain URL"
- Enter your staging domain (e.g.,
https://staging.yourdomain.com.au) - Complete any verification if required
- This allows you to test Shop Pay in test mode on staging
Step 3: Configure Webhooks in Shopify
Webhooks enable Shopify to notify WooCommerce when Shop Pay payments are processed. This is critical for automatic order status updates.
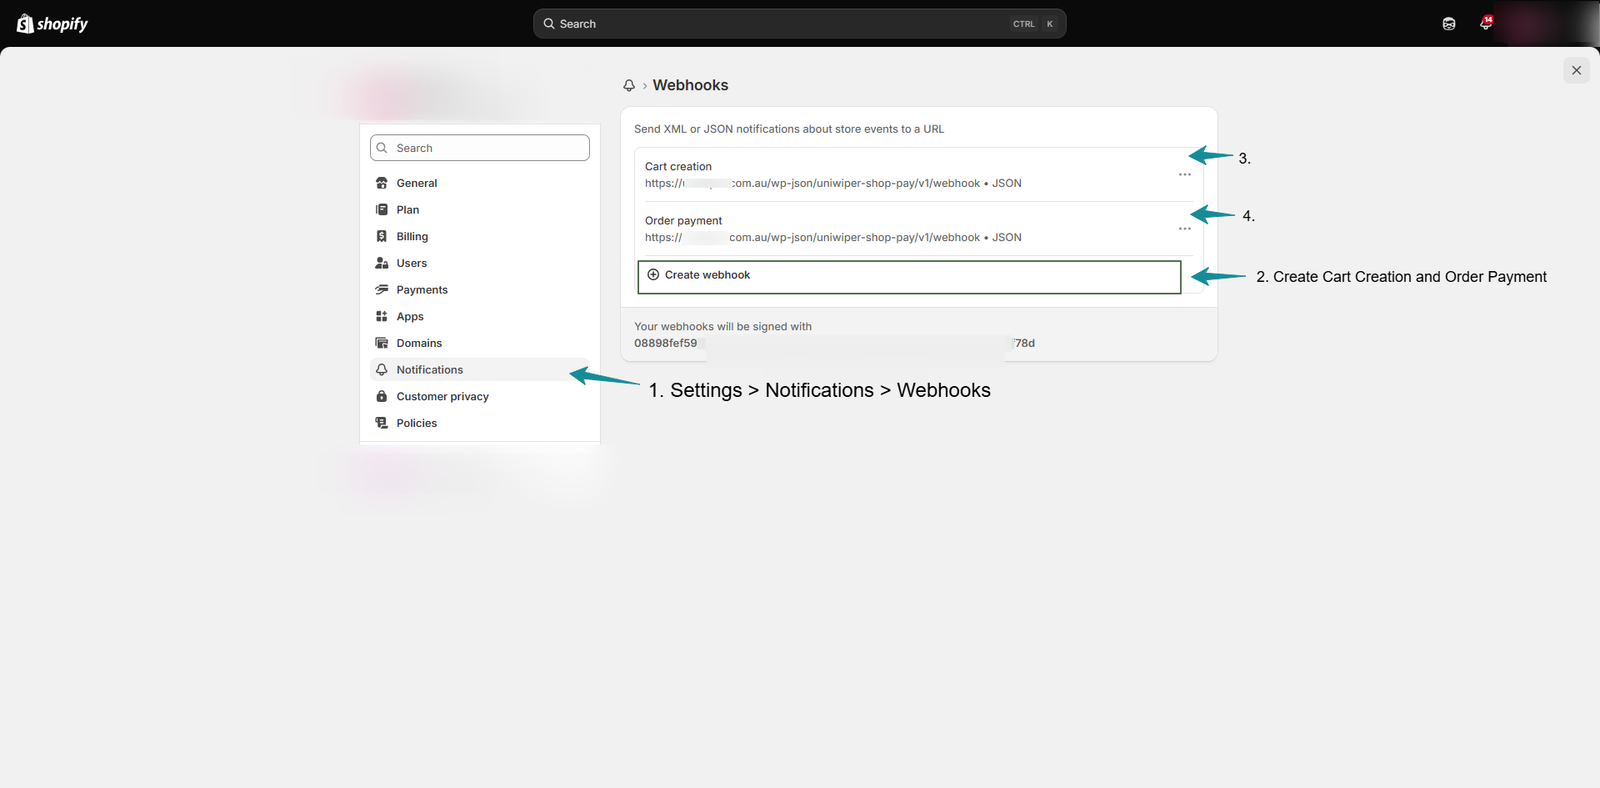
3.1 Navigate to Webhooks Settings
- In your Shopify admin, go to Settings
- Click Notifications
- Scroll down to Webhooks section
- Click "Create webhook"
3.2 Create Cart Creation Webhook
Select Event
Event: Select "Cart creation"
Select Format
Format: Select "JSON"
Enter Webhook URL
Webhook URL:
https://yoursite.com/wp-json/uniwiper-shop-pay/v1/webhook
Replace yoursite.com with your actual domain
Create Webhook
Click "Create webhook"
3.3 Create Order Payment Webhook
- Click "Create webhook" again
- Event: Select "Order payment"
- Format: Select "JSON"
- Webhook URL: Use the same endpoint:
https://yoursite.com/wp-json/uniwiper-shop-pay/v1/webhook
- Click "Create webhook"
3.4 Copy Your Webhook Signing Secret
After creating the webhooks, you'll see a message:
"Your webhooks will be signed with: [secret]"
- Copy the webhook signing secret (a hexadecimal string)
- Important: You'll need this for WooCommerce configuration
- Note the expiration time (usually 78 days)
- You may need to regenerate it periodically
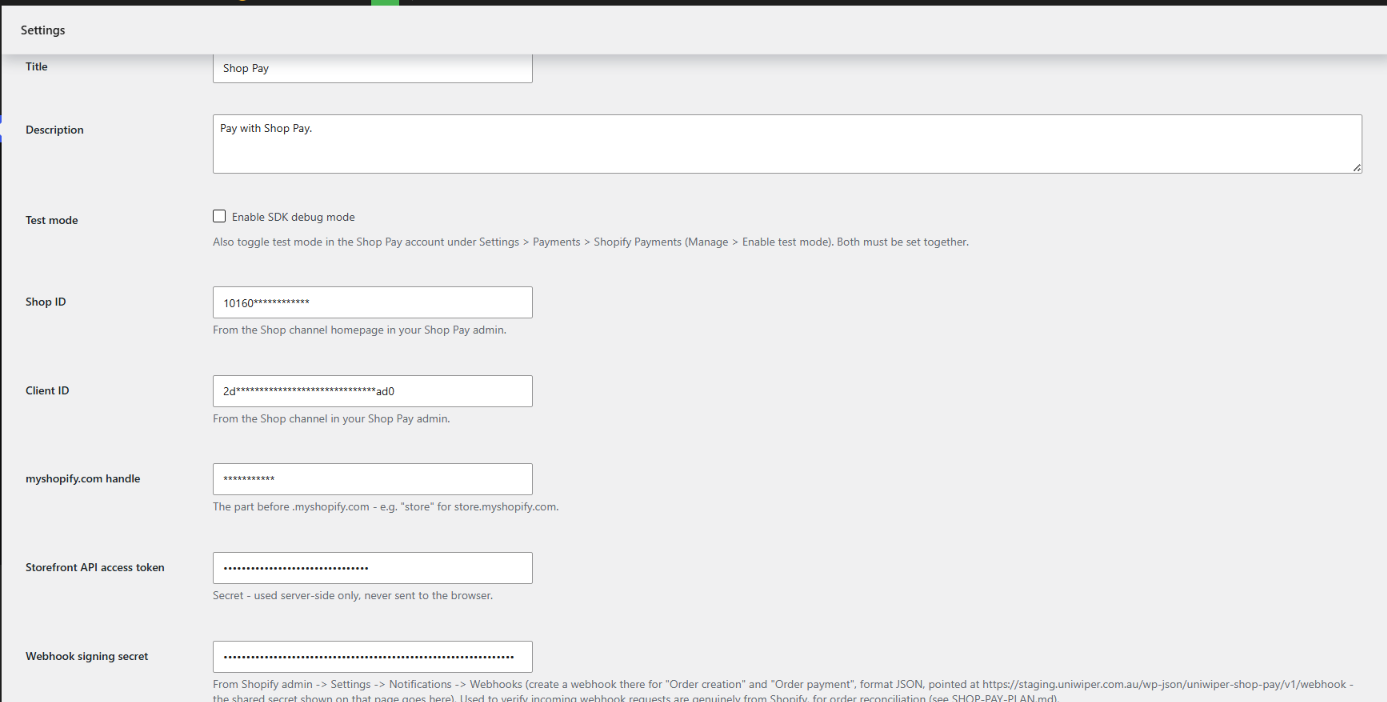
Step 4: Configure WooCommerce Settings
Now configure the plugin in WooCommerce using all your Shopify credentials and webhooks.
4.1 Navigate to Payment Settings
- Log in to your WordPress admin
- Go to WooCommerce → Settings
- Click the Payments tab
- Look for "Shop Pay Wallet" in the payment methods list
- Click on it to open settings (or click "Manage")
4.2 Enable the Gateway
Check the "Enable Shop Pay Wallet" checkbox to activate Shop Pay as a payment option.
4.3 Enter Your Credentials
Fill in the following fields with the information you gathered earlier:
| Field | Value | Example |
|---|---|---|
| Shop ID | From Shopify Shop settings | 1234567890 |
| Client ID | From Shopify Shop settings | abc12def-34gh-56ij-78kl-901234mnopqr |
| myshopify.com Handle | Your Shopify domain | mystore.myshopify.com |
| Storefront API Token | From Shopify Shop settings | shpat_... |
4.4 Add Webhook Signing Secret
- Paste the webhook signing secret from Shopify (from Step 3.4)
- Example:
a1b2c3d4e5f6g7h8i9j0k1l2m3n4o5p6 - This is critical for verifying webhook authenticity
4.5 Optional: Set Shopify Order Name Prefix
- Shopify Order Name Prefix: Add a prefix to distinguish WooCommerce orders from Shopify orders
- Example:
NZwould make WooCommerce order #123 appear asNZ-123in Shopify - This helps when managing orders across both platforms
- Leave blank if you don't need this
4.6 Enable Test Mode (Recommended)
- Check the "Test mode" checkbox
- This uses Shopify's test card numbers - no real charges
- Use this to verify everything works before going live
4.7 Save Settings
Click "Save changes" at the bottom of the page.
Step 5: Test Your Configuration
Before going live, thoroughly test the Shop Pay integration.
5.1 Test Mode Testing
- Ensure Test mode is enabled in WooCommerce settings
- Add a product to your cart
- Go to your Cart or Checkout page
- You should see a "Buy with Shop Pay" button
- Click it to test the flow
5.2 Use Shopify Test Cards
When testing in Shop Pay:
- Card number:
4111 1111 1111 1111 - Expiry: Any future date (e.g., 12/25)
- CVC: Any 3 digits (e.g., 123)
5.3 Verify Order Creation
After completing a test payment:
- Check WooCommerce:
- Go to WooCommerce → Orders
- A new order should appear with status "Pending payment"
- Check Shopify:
- Go to your Shopify admin → Orders
- A corresponding order should appear
- It may take a few seconds to appear
- Verify Webhook:
- The order status should automatically update from "Pending payment" to "Processing" within seconds
- If it doesn't change after 1-2 minutes, check webhook configuration
5.4 Test Express Checkout Button
- Go to your Cart page - the button should appear above the cart table
- Go to your Checkout page - the button should appear above the form
- Both should be styled and functional
5.5 Troubleshooting Test Issues
| Problem | Solution |
|---|---|
| Button doesn't appear | Verify Shop ID and Client ID are correct. Check test mode is enabled. |
| Payment fails | Use exact test card: 4111 1111 1111 1111. Check Storefront API token is valid. |
| Order doesn't appear in WooCommerce | Check webhook configuration. Verify webhook signing secret is correct. |
| Order stays "Pending payment" | Webhook may not have fired. Check Shopify webhook delivery logs. |
Step 6: Go Live
Once testing is complete and working smoothly:
6.1 Disable Test Mode
- Go to WooCommerce → Settings → Payments → Shop Pay Wallet
- Uncheck the "Test mode" checkbox
- Click "Save changes"
6.2 Use Live Shop Pay Credentials
Ensure you're using your live Shop Pay credentials:
- Shop ID - verify it's your live Shop ID
- Client ID - verify it's your live Client ID
- Storefront API Token - make sure this is the live token
6.3 Perform Live Test
- Add a real product to cart
- Go to checkout
- Click "Buy with Shop Pay"
- Complete payment with a real card
- Verify the order appears in both WooCommerce and Shopify
6.4 Monitor First Payments
- Watch for orders in WooCommerce and Shopify
- Verify webhook delivery
- Ensure orders transition from "Pending payment" to "Processing" automatically
Security Best Practices
- Protect Your Credentials:
- Never share your Storefront API token
- Never commit credentials to version control
- Use WordPress environment variables if possible
- Monitor Webhooks:
- Regularly check Shopify webhook delivery logs
- Look for failed deliveries - they indicate configuration issues
- Location: Shopify admin → Settings → Notifications → Webhooks
- Webhook Secret Rotation:
- Shopify's webhook secrets expire (usually every 78 days)
- When expiring, regenerate in Shopify admin
- Update WooCommerce settings immediately with the new secret
- HTTPS Required:
- Your webhook URL must use HTTPS (not HTTP)
- Shop Pay requires secure communication
Troubleshooting
Issue: "Buy with Shop Pay" button doesn't appear
- Verify Shop ID and Client ID are entered correctly in WooCommerce settings
- Ensure the plugin is activated
- Clear WordPress cache and browser cache
- Verify you're on a cart or checkout page (button only shows there)
Issue: Payment fails when clicking the button
- Verify Storefront API token is correct and hasn't expired
- Confirm your store domain is in Shopify's allowed origins
- Check that you're using correct test/live credentials for your test mode setting
- Verify your Shopify Payments account is properly funded and active
Issue: Order appears in Shopify but not WooCommerce
- Check that the webhook URL is correctly configured in Shopify
- Verify the webhook signing secret is correct in WooCommerce settings
- Check Shopify webhook delivery logs: Settings → Notifications → Webhooks
- Look for error messages in WooCommerce error logs
Issue: Order stays "Pending payment" even after successful payment
- Most common cause: webhook not configured or firing
- Check Shopify webhook delivery status in: Settings → Notifications → Webhooks
- Verify webhook URL is exactly correct (case-sensitive)
- Verify webhook signing secret matches in WooCommerce
- Try manually triggering a webhook retry in Shopify admin
Issue: Lost or forgot to copy Storefront API token
- The token can only be viewed once when first generated
- If you didn't copy it, you must regenerate it in Shopify
- Go to Shop → Settings → Integrate Shop Pay
- Regenerate the Storefront API token (the copy button will appear)
- Copy the new token immediately and update in WooCommerce
Issue: "Shop Pay button doesn't appear on staging/alternative domain"
- You may have missed adding that domain to Shopify's Allowed origins
- Go to Shop → Settings → Allowed origins
- Click "Add domain URL" and add your missing domain
- Wait a few minutes for changes to propagate
- Clear cache and test again
Issue: Credentials showing as invalid in WooCommerce
- Verify you copied them exactly with no extra spaces
- Make sure you're using the correct Shop ID (numeric, not Client ID)
- Verify Client ID includes the full UUID with hyphens
- Check that Storefront API token wasn't truncated when pasting
- Regenerate credentials in Shopify if unsure
Issue: Webhook signing secret keeps expiring
- Shopify secrets expire after ~78 days
- Set a calendar reminder to rotate the secret periodically
- Generate new secret in Shopify, update in WooCommerce
Support & Resources
For additional help:
- Email Support: costatechnolab[at][gmail].com
- Plugin Support Forum
- Shopify Shop Pay Documentation
- Shopify Storefront API Documentation